UI Framework
1. UI Framework에서 제공하는 공통 UI 컴포넌트를 통해 빠르게 아름다운 UI를 구현할 수 있다.
2. 대표적으로 bootstrap, material-ui가 있다.
3. 그러나 위의 framework를 사용하다보면 custom 하기가 불편하다.
4. 당연하게도 정해진 rule 안에서 이쁘고 빠르게 구현할 수 있도록 도와주기 때문에 내 입맛에 맞도록 하려면 다른 방법을 찾는게 맞긴 하다.
5. 더 큰 문제는 컴포넌트들이 여러 기능을 지원하기 때문에 무겁고 복잡하다.
6. Button 하나를 표현하는데 수 많은 Element, CSS와 animation, javascript 이벤트가 실행된다.
7. 또한 UI Framework로 만든 결과물은 비슷하기 때문에 나만의 또는 우리 회사만의 색을 표현하기에는 어렵다.
Radix UI
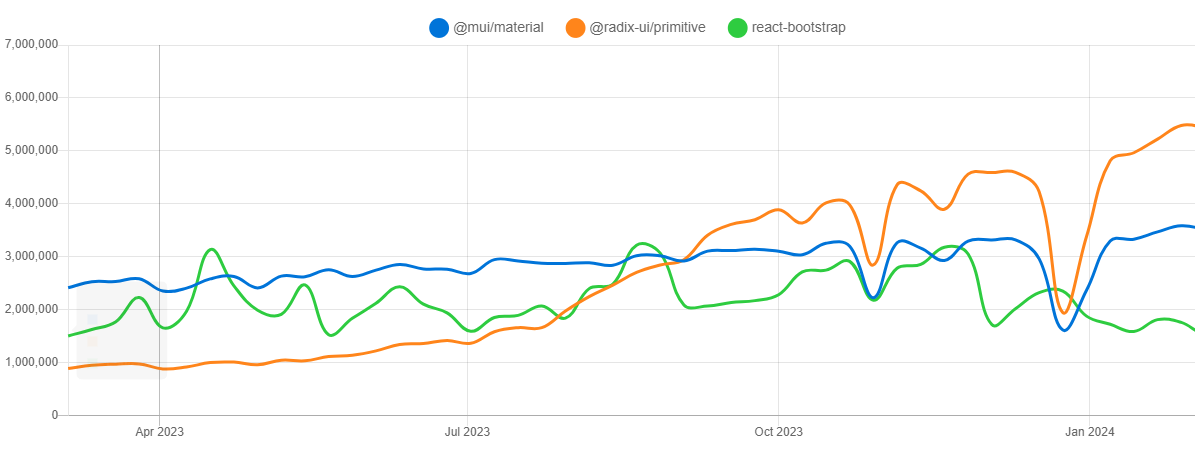
1. 지난 1년간 npm trend를 보면 기존 형님들을 제치고 떠오르는 신흥 강자가 있다.
2. radix ui는 headless-ui 로 디자인 없이 기능만 제공해준다.
3. 공통으로 쓰이는 컴포넌트들이 미리 구축되어있고 디자인만 내 입맛에 맞게하면 된다.
4. 기능 또한 custom하기가 매우 편리하다.

shadcn/ui
1. Radix UI에 tailwindcss를 더하여 구축된 공통 컴포넌트를 제공한다.
2. 라이브러리가 아니고 복사하여 붙여넣을 수 있는 재사용 가능한 컴포넌트 모음이다.
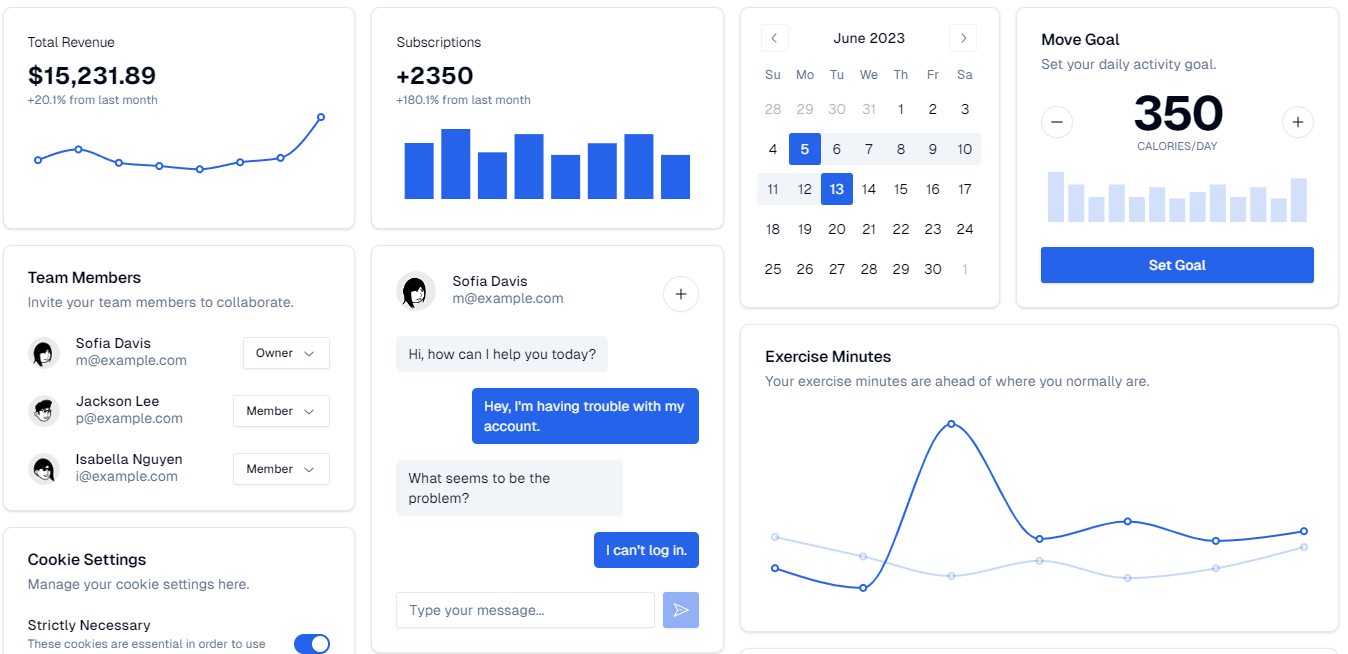
3. 아래와 같이 멋진 컴포넌트를 기본적으로 쉽게 사용할 수 있고 custom 하기도 매우 편하다.
4. tailwindcss를 사용할 수 있어서 스타일링하기가 편하다.

설치
nextjs 프로젝트에 shadcn-ui 초기화
npx shadcn-ui@latest init

css variables를 사용하면 globals.css에 전역으로 색상이 정의된다.
@layer base {
  :root {
    --background: 0 0% 100%;
    --foreground: 0 0% 3.9%;

    --card: 0 0% 100%;
    --card-foreground: 0 0% 3.9%;

    --popover: 0 0% 100%;
    --popover-foreground: 0 0% 3.9%;

    --primary: 0 0% 9%;
    --primary-foreground: 0 0% 98%;

    --secondary: 0 0% 96.1%;
    --secondary-foreground: 0 0% 9%;

    --muted: 0 0% 96.1%;
    --muted-foreground: 0 0% 45.1%;

    --accent: 0 0% 96.1%;
    --accent-foreground: 0 0% 9%;

    --destructive: 0 84.2% 60.2%;
    --destructive-foreground: 0 0% 98%;

    --border: 0 0% 89.8%;
    --input: 0 0% 89.8%;
    --ring: 0 0% 3.9%;

    --radius: 0.5rem;
  }
아래와 같이 css variables를 사용할 수 있다.
<div className="bg-foreground text-popover">
init 후 자동으로 파일 생성 및 설정
components.json
{
  "$schema": "https://ui.shadcn.com/schema.json",
  "style": "default",
  "rsc": true,
  "tsx": true,
  "tailwind": {
    "config": "tailwind.config.ts",
    "css": "src/app/globals.css",
    "baseColor": "slate",
    "cssVariables": false,
    "prefix": ""
  },
  "aliases": {
    "components": "@/components",
    "utils": "@/lib/utils"
  }
}
aliases에 설정된 경로에 컴포넌트와 util 함수가 생성된다.
lib/utils.ts
import { type ClassValue, clsx } from "clsx"
import { twMerge } from "tailwind-merge"

export function cn(...inputs: ClassValue[]) {
  return twMerge(clsx(inputs))
}
아래와 같이 조건부 className이 필요할 경우 cn함수를 사용한다.
<div className={cn("bg-black", isActive ? "text-white" : "text-red-500")}>
  card
</div>
tailwind.config.ts
기본설정 ,플러그인이 추가된다.
import type { Config } from "tailwindcss"

const config = {
  darkMode: ["class"],
  content: [
    './pages/**/*.{ts,tsx}',
    './components/**/*.{ts,tsx}',
    './app/**/*.{ts,tsx}',
    './src/**/*.{ts,tsx}',
  ],
  prefix: "",
  theme: {
    container: {
      center: true,
      padding: "2rem",
      screens: {
        "2xl": "1400px",
      },
    },
    extend: {
      keyframes: {
        "accordion-down": {
          from: { height: "0" },
          to: { height: "var(--radix-accordion-content-height)" },
        },
        "accordion-up": {
          from: { height: "var(--radix-accordion-content-height)" },
          to: { height: "0" },
        },
      },
      animation: {
        "accordion-down": "accordion-down 0.2s ease-out",
        "accordion-up": "accordion-up 0.2s ease-out",
      },
    },
  },
  plugins: [require("tailwindcss-animate")],
} satisfies Config

export default config
정리해보면 폴더 구조는 다음과 같다
.
├── app
│   ├── layout.tsx
│   └── page.tsx
├── components
│   ├── ui
│   │   ├── alert-dialog.tsx
│   │   ├── button.tsx
│   │   ├── dropdown-menu.tsx
│   │   └── ...
│   ├── main-nav.tsx
│   ├── page-header.tsx
│   └── ...
├── lib
│   └── utils.ts
├── styles
│   └── globals.css
├── next.config.js
├── package.json
├── postcss.config.js
├── tailwind.config.js
└── tsconfig.json
이제 필요한 component를 추가해 보자
Dialog
https://ui.shadcn.com/docs/components/dialog
Dialog
A window overlaid on either the primary window or another dialog window, rendering the content underneath inert.
ui.shadcn.com
terminal에 다음 명령어 실행
npx shadcn-ui@latest add dialog

import {
  Dialog,
  DialogContent,
  DialogDescription,
  DialogHeader,
  DialogTitle,
  DialogTrigger,
} from "@/components/ui/dialog";

const ShadcnPage = () => {
  return (
    <div className="min-h-screen flex items-center justify-center">
      <Dialog>
        <DialogTrigger className="bg-teal-500 rounded-md px-4 py-2 font-semibold text-white">
          Open
        </DialogTrigger>
        <DialogContent>
          <DialogHeader>
            <DialogTitle>Are you absolutely sure?</DialogTitle>
            <DialogDescription>
              This action cannot be undone. This will permanently delete your
              account and remove your data from our servers.
            </DialogDescription>
          </DialogHeader>
        </DialogContent>
      </Dialog>
    </div>
  );
};
DialogTrigger 컴포넌트는 모달을 활성화 시켜주는 버튼 역할을 한다.

만약 모달의 사이즈를 여러 개 입력받을 수 있게 하고 싶다면?
기본 DialogContent는 아래와 같다.
const DialogContent = React.forwardRef<
  React.ElementRef<typeof DialogPrimitive.Content>,
  React.ComponentPropsWithoutRef<typeof DialogPrimitive.Content>
>(({ className, children, ...props }, ref) => (
  <DialogPortal>
    <DialogOverlay />
    <DialogPrimitive.Content
      ref={ref}
      className={cn(
        "fixed left-[50%] top-[50%] z-50 grid w-full max-w-lg translate-x-[-50%] translate-y-[-50%] gap-4 border border-slate-200 bg-white p-6 shadow-lg duration-200 data-[state=open]:animate-in data-[state=closed]:animate-out data-[state=closed]:fade-out-0 data-[state=open]:fade-in-0 data-[state=closed]:zoom-out-95 data-[state=open]:zoom-in-95 data-[state=closed]:slide-out-to-left-1/2 data-[state=closed]:slide-out-to-top-[48%] data-[state=open]:slide-in-from-left-1/2 data-[state=open]:slide-in-from-top-[48%] sm:rounded-lg dark:border-slate-800 dark:bg-slate-950",
        className
      )}
      {...props}
    >
      {children}
      <DialogPrimitive.Close className="absolute right-4 top-4 rounded-sm opacity-70 ring-offset-white transition-opacity hover:opacity-100 focus:outline-none focus:ring-2 focus:ring-slate-950 focus:ring-offset-2 disabled:pointer-events-none data-[state=open]:bg-slate-100 data-[state=open]:text-slate-500 dark:ring-offset-slate-950 dark:focus:ring-slate-300 dark:data-[state=open]:bg-slate-800 dark:data-[state=open]:text-slate-400">
        <X className="h-4 w-4" />
        <span className="sr-only">Close</span>
      </DialogPrimitive.Close>
    </DialogPrimitive.Content>
  </DialogPortal>
))
1. 바로 위에 타입과 모달 사이즈를 정의한다.
type ModalSize = 'default' | 'sm' | 'md' | 'lg' | 'xl' | 'full';

const modalSizes: Record<ModalSize, string> = {
  default: 'max-w-lg',
  sm: 'max-w-md',
  md: 'max-w-2xl',
  lg: 'max-w-screen-lg',
  xl: 'max-w-screen-xl',
  full: 'max-w-full',
};
const DialogContent = React.forwardRef<
  React.ElementRef<typeof DialogPrimitive.Content>,
  React.ComponentPropsWithoutRef<typeof DialogPrimitive.Content> & {
    size?: ModalSize;
  }
>(({ className, children, size = 'default', ...props }, ref) => (
  <DialogPortal>
    <DialogOverlay />
    <DialogPrimitive.Content
      ref={ref}
      className={cn(
        'max-w- fixed left-[50%] top-[50%] z-50 grid w-full translate-x-[-50%] translate-y-[-50%] gap-4 border border-slate-200 bg-white p-6 shadow-lg duration-200 data-[state=open]:animate-in data-[state=closed]:animate-out data-[state=closed]:fade-out-0 data-[state=open]:fade-in-0 data-[state=closed]:zoom-out-95 data-[state=open]:zoom-in-95 data-[state=closed]:slide-out-to-left-1/2 data-[state=closed]:slide-out-to-top-[48%] data-[state=open]:slide-in-from-left-1/2 data-[state=open]:slide-in-from-top-[48%] sm:rounded-lg dark:border-slate-800 dark:bg-slate-950',
        modalSizes[size],
        className,
      )}
      {...props}
    >
      {children}
      <DialogPrimitive.Close className="absolute right-4 top-4 rounded-sm opacity-70 ring-offset-white transition-opacity data-[state=open]:bg-slate-100 data-[state=open]:text-slate-500 hover:opacity-100 focus:outline-none focus:ring-2 focus:ring-slate-950 focus:ring-offset-2 disabled:pointer-events-none dark:ring-offset-slate-950 dark:data-[state=open]:bg-slate-800 dark:data-[state=open]:text-slate-400 dark:focus:ring-slate-300">
        <X className="h-4 w-4" />
        <span className="sr-only">Close</span>
      </DialogPrimitive.Close>
    </DialogPrimitive.Content>
  </DialogPortal>
));
2. DialogContent에 size를 받는다.
3. size를 입력하지 않으면 default인 max-w-lg가 되도록 한다.
4. className의 cn에 argument로 modalSizes[size]를 추가한다.
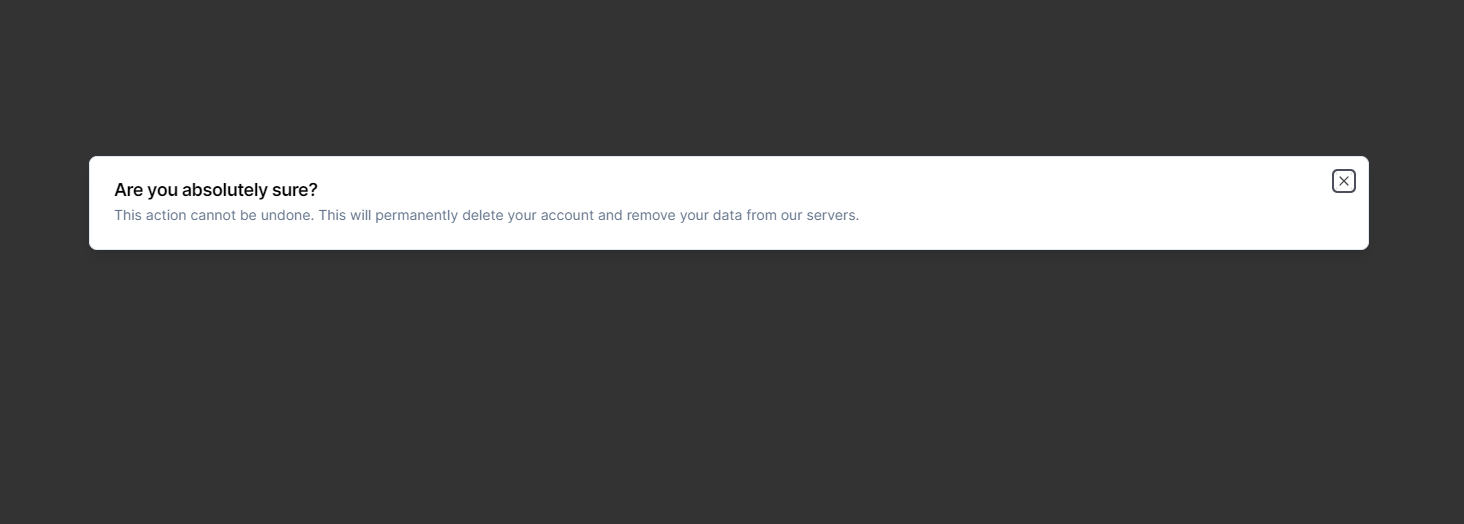
xl 사이즈로 변경하면 다음과 같이 적용된 것을 확인할 수 있다.
<Dialog>
  <DialogTrigger>Open</DialogTrigger>
  <DialogContent size="xl">
    <DialogHeader>
      <DialogTitle>Are you absolutely sure?</DialogTitle>
      <DialogDescription>
        This action cannot be undone. This will permanently delete your
        account and remove your data from our servers.
      </DialogDescription>
    </DialogHeader>
  </DialogContent>
</Dialog>
'react' 카테고리의 다른 글
| zustand에 devtools 사용하기 (0) | 2024.10.27 |
|---|---|
| Suspense를 활용한 SSR Architecture의 성능 개선 (0) | 2024.05.01 |
| useFormState hook으로 Form 상태를 다루자 (0) | 2024.03.10 |
| nextjs 최신 버전 프로젝트 설정 (eslint, pretter) (0) | 2024.03.05 |
| React 19 버전 canary (0) | 2024.03.05 |


